Morpher for Windows 3.1 |
- 1. About Morpher
- 2. Using Morpher
- 3. To make effective morphing
- 4. FAQ about Morpher
- 5. About this software
- 1. About Morpher
- 1.1 Ovewview
- Morpher makes digital movies using a 2-D morph between two still images.
- Morphing is one of technologies witch transforms an image to another image. The famous movie
"Terminator 2" uses morphing in the scene of metamorphosis metal lump to human body. You can not create
these advanced digital movies using "Morpher", but you can simulate a child face from images of husband
and wife.
- 1.2 Minimum System Requirements for Morpher
- Windows95, 98, ME, 2000, WindowsNT4.0 or later
- Internet Explorer4.0, 5.0, 5.5 or later
- (Morpher3.1 is a Java application and it rus under the Java virtual machine. Internet Explorer4.0 includes
MS-Java virtual machine.) The latest version of MS-Java virtual machine is uploaded at
http://www.microsoft.com/java/ or
http://www.microsoft.com/.
- 2. Using Morpher
- 2.1 Overview to make MORPH
- (1) Prepare images.
- (2) Import those images.
- (3) Set up point. Points are corresponding points on the two images.
- (4) Make boundary. A boundary is a line which ends are two points.
- (5) Image transform parameter set
- (6) Start rendering.
- 2.2 Prepare images
- Prepare two still images to be used as first and last frames. Image format must be JPEG, GIF or BMP. I suggest image files to be full-color mode.
- If you prepare 3 or more images, You can make a movie changeing images from A to B to C ...
- 2.3 Importing images
- Start Morpher and select [New] command from the [File] menu to create a new document. This document is called "Workset". The workset contains images of the first and last frames as well as point and boundary information. An empty split window will open. Left area for the first frame and right area for the last frame. If you prepare 3 or more images, Select [Insert frame] command from [Frame] menu to add a new frame before current frame.
- Select [Import Image...] command from [File] menu to import images into the current frame. If the image data was copied to clipboard, you can use the [Paste] command from the [Edit] menu. It is necessary to import two images.
- If imported image is learger than workset size, image will be clipped. You can drag image and points
to optimized posision. If you drag with Shift key down, only image's posision will be changed.
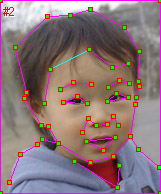
- 2.4 Editing Points
- Points are corresponding points on the two images. Points should be made at the edges of shapes.
- How to make Points:
- (1) Select [Edit point mode] command from the [Mode] menu.
- (2) Double click image to make a Point. Points are indicated by green & red rectangles. After selecting point, the rectangles will be blue & yellow.
- (3) A point will be made another image area and you can drag it. To delete a point, select [Delete]
command from the [Edit] menu.

- 2.5 Editing Boundary
- A boundary is a line which ends are two points. Boundary is better to be on the edges of shapes.
- How to make boundaries:
- (1) Select [Edit boundary mode] command from the [Mode] menu.
- (2) Click the one point that is to form boundary. The mouse cursor will change.
- (3) Click on another point to form a boundary. Boundaries are indicated by magenta line. A selected boundary is indicated by cyan line.
- To select a boundary, double click nearby the boundary. To delete a boundary, select [Delete] command
from the [Edit] menu.
- 2.6 Image transform parameter set
- Select [Rendering option] command from the [Mode] menu to open Rendering option dialog.
- Select the rendering method and number of frames.
- Rendering method : Morphing makes normal morphing effect. Warping not transforms color.
Only change image shapes. If you select Warping, you can make movies such as changing face expression from
one picture.
- Number of frames : Select number of frames to create a movie.
- 2.7 Rendering
- After make boundaries, begin rendering. Select [Start rendering] command from the [Mode] menu
to open rendering dialog. Preview before making the movie to find out how much processing time is
needed.
- Action
Select make a movie or preview. - Rendering quality
Rendering images is heavy work for CPU. High quality rendering works very slowly. - Preview point
Set preview point. - Format
Select movie format. AVI, GIF animation, Still image files are available. BMP and JPEG is available for still image format. - Make foward and back stream
If this option was selected, Movie will change left image to right image to left image.
- Action
- 3. To make effective morphing
- 3.1 Best way to select source image
- - Photograph is better than primitive figure or string image.
- - Solid color background is better.
- - Full color or True color is better than index color picture.
- 3.2 Where point must be?
- Morphing changes image with Colors and shapes. Morpher makes change color automatically. But, you
must input the information about changing shape to design point. Please see sample morphing data.
- It is effective morphing if points are these address.
- - The edge of object. If you want to morph two faces, Points must be the edge of face and hair.
- - The area which has object's personality. If you want to morph two faces, Points must be on the eyes,
mouth and nose.
- 3.3 Where boundary must be?
- A boundary bust be on the edge of shapes and the edge of image.
- 4. FAQ about Morpher
- Frequently Asked Questions about Morpher.
- Rendering image's color was broken
- Question : Rendering image's color was broken. It looks gray-scale image or blue and gray image.
- Answer : Now, Java application does not work right on 32-bit color mode, Please change
display mode as 24-bit color mode. To change color mode, Click right mouse button on desktop and
open display property.
- Movie window will close soon
- Question : Morpher works right and complete making a movie. But, after double click AVI movie file, Movie window was open, play once and close window soon!
- Answer : It is default configulation of Windows active movie. Media Player 7 does not close window. I suggest to install Windows Media Player 7. If you want to use Active movie, Please change relation of file-type and application.
- Select [Option...] command from [View] menu at Explorer.
- Select File-type tag.
- Search [Video clip] from file-type list. suffix:AVI MIME:video/x-msvideo application:RUNDLL32
- Edit this file type's information using Edit button. File-type edit dialog will open.
- Double-click [Play] on action list. Edit action dialog will open.
- Change command line as delete "/close" string.
- 5. About this software
- Morpher for Windows is a share ware. You may distribute this product on a non-profit basis. You are
permitted to use it on a trial basis for up to about 20 days. If you wish to continue using the product
beyond that period, you are expected to pay a share ware fee of US$20 or Japanese 2000 Yen or other
currency (equivalent value). Send a money order to the address below. I'm very happy if you use
International post cash. Please specify your name and return address and your E-mail address.
-
Name : Masakazu Fujimiya Address : 2-24-6-307, Minami-Yamada, Tuzuki-ku, Yokohama 224-0029, Japan - When you pay a share ware fee, you will receive a registration number. After input registration
number to the help dialog, Your Morpher will clear the red and white string drawn into your work.
- The latest version of Morpher is uploaded on this URL.
- http://www.asahi-net.or.jp/~FX6M-FJMY/mop00e.html
Masakazu Fujimiya
| E-mail : | masa.fujimiya@nifty.com |
| Web Page : | http://www.asahi-net.or.jp/~FX6M-FJMY/ |